
Note. This article draws on concepts presented in What Utility Is and Isn't, The Certain Equivalent, and Utility in Money. Reading those articles, in that order, is highly recommended.
We’ve now covered all the concepts required to build a decision tree. This week we will practice using all these skills in concert. In this video, I will provide a detailed example for building and using a decision tree to arrive at a good decision.
Here, I will break the task of building a tree into nine steps. We have already practiced almost all of these steps in isolation, and now we’re putting all the pieces together.
Our first example concerns a subject who is finishing up their undergraduate degree. They are planning for post-graduate life.
Step 1: List the options.
The subject can’t decide between following up their graduation with a Master’s Degree, a PhD, or going straight into a full-time job in industry. After some reflection, they conclude these are indeed the only three options that they deem worthy of serious consideration.
Of course, the option of taking a full-time job encompasses its own myriad of possibilities, but those possibilities will tend to be more similar to each other than they are to the option of continuing school in some form.
Step 2: List the critical variables.
Decisions complex enough to be worthy of building a decision tree will usually involve multiple implicit variables, which may be entangled or difficult to weigh or measure against one another. So the first step is simply listing these variables.
When this subject introspects on the sources of internal conflict, on the factors that they find themselves hemming and hawing over, they conclude that the main factors that they are trying to weigh are money, optionality, and time invested. Different people will have different sources of conflict. Others might be more concerned with ultimate life satisfaction, impact, parental approval, or fame. Those issues which you have the most difficulty arbitrating between internally, are the issues you should put on your list when struggling with a decision.
Step 3: Bin the possible outcomes.
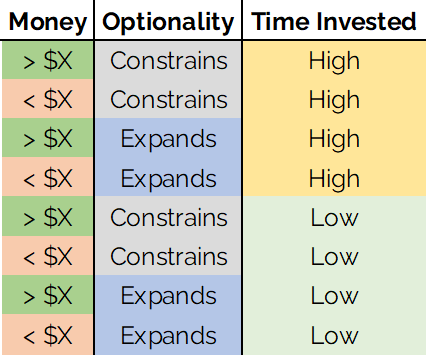
Having listed our critical variables, we break each of our variables into possible states. Some variables are easier to break down than others. Intuitively, a given choice will either tend to increase optionality, decrease optionality, or preserve present optionality, so those are three natural possible states for the “outcomes” variable. Perhaps none of the available options preserves present optionality, so we can reduce that to two.
The subject might break the “time invested” variable up in any number of ways. They could decide there are two main possibilities they are concerned about, options that take less than three years or more than three years; or perhaps it is actually important to them to weigh the time more precisely. As far as our subject is concerned, they decide that simply asking if the time investment is probably more than 3 years, or less than 3 years, is adequate.
Money is potentially even more complex, and it may be difficult at this stage to even know how to break it down, since the amount of money you may earn in the future, under a variety of assumptions, can be very uncertain; but we make this temporarily easier on ourselves by binning the possibilities we’re most concerned about. For some pertinent dollar value $X, the subject breaks the space of possible outcomes into “futures where they will probably make more than this” and “future where they will probably not make more than this.” You can always come back later and tweak this number if you decide that you need to.
Here, I have broken each of the relevant variables into two bins. You could use more bins if you felt like you needed to. The only consequence will be more sorting on the next step.
Step 4: Rank the possible outcomes.
Now that we have broken out of the confusing morass of possible vague futures and put the possible outcomes in buckets, we rank those outcomes.
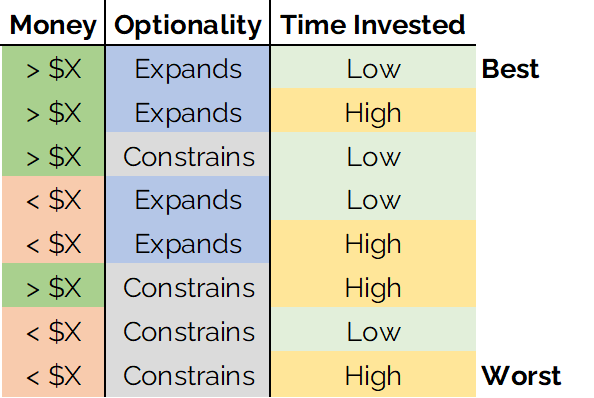
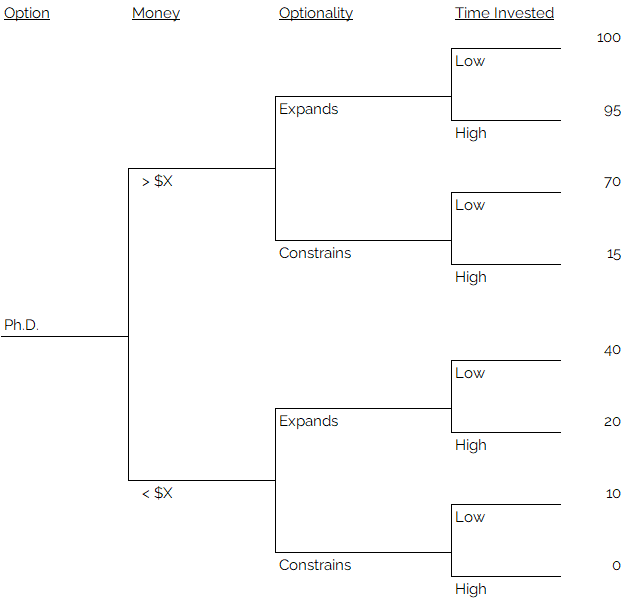
The “best” and “worst” possible outcomes are usually very obvious; the best outcome is simply the combination of all the best outcomes for each variable. The best case is high money, high optionality, low time investment; the worst option is low money, constrained optionality, and high time investment. But the intermediate rankings are where you might find surprises. The subject is forced to weigh outcomes that are identical except for specific differences in single variables, and patterns emerge. Prior to doing this exercise of ranking outcomes, the subject might not have realized that they valued optionality this highly; note that, while instances of “low time investment” and “high money” do appear in the bottom three options, no instances of “expanding optionality” fall lower than 5th place.
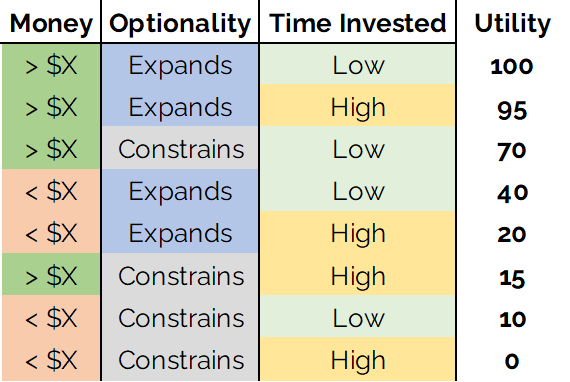
Let’s pause here to point something out; sometimes, after getting this far in the process, you might decide to stop. Having now disentangled your confused and conflicting desires, it may be obvious that one of these variables dramatically trumps all the others, and the best option suddenly seems obvious. And that’s fine; practical decision making is all about efficiency and decisiveness. But if you don’t quite feel that the problem has been resolved, then continue. Step 5: Assign utility rankings to all outcomes.
We learned the trick of the certain equivalent last time so that you would feel prepared to tackle the question of assigning utilities to the different outcomes. You don’t need to use the certain equivalent trick; the point of the trick is just to get your mind used to thinking in terms of weighing potentially very different options against each other.
The subject fills in their utility assessment charge as follows, indicating the relative value of each outcome.
The structure of the tree follows the same logic as the table. Each branch of the tree corresponds to a distinction. We start with the first option, pursuing the Ph.D., and build out the tree. It does not matter what order we add the distinctions, the end results will be the same. Feel free to prove this to yourself if you wish by building trees in different ways. If the answer comes out different, that’s a good indicator that you’ve made a mistake somewhere.
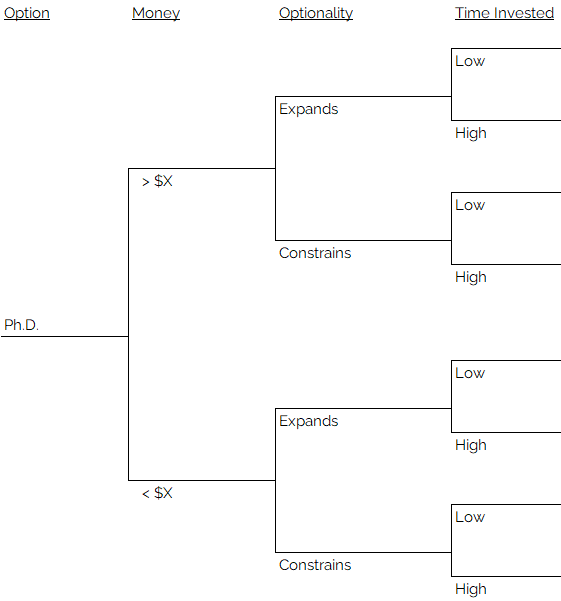
At this stage, assign the utility values that you decided upon to each of the terminal nodes, or leaves of the tree.
Step 7: Assign probabilities to the tree branches.
This is why we spent so much effort thinking about probability trees and working to become calibrated. The aim here is to assign probability values to each branch, associated with this specific option. Remember, what we are looking at here is a “sub-tree”, or, just the tree associated with the Ph.D. option.

Here the subject uses their knowledge and understanding of the relative merits and drawbacks of the options to fill in the probability levels of each branch. For example, here, the subject decides that a Ph.D. is likely to provide an 80% likelihood of exceeding the target salary, a 60% chance of expanding long-term optionality, and a 0% chance of taking less than 3 years. Step 8: Calculate the expected value of each option.
We have already practiced doing this; but as a reminder, you can calculate the expected value at each branching point piecemeal and save yourself some confusion.
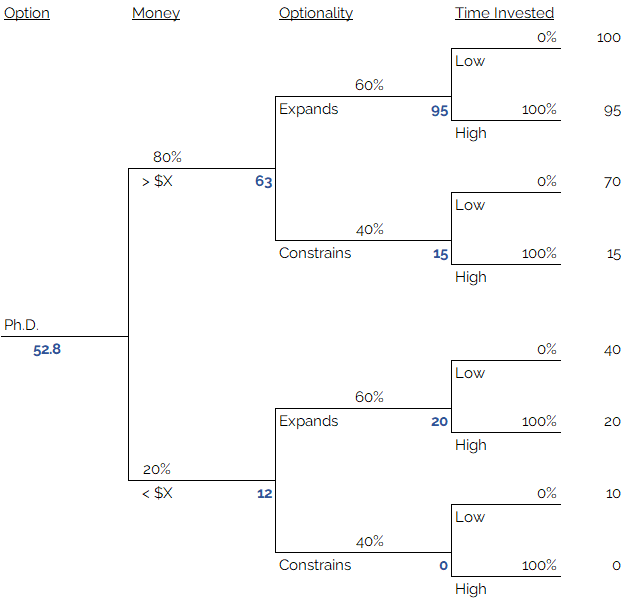
You can look at it like this, starting from the topmost leaf node: the expected value of the “time invested” variable, given that you are already in the “high money, expanding optionality” branch, is 0% x 100 + 100% x 95, which equals 95. The expected value of the “time invested” variable, given that you are in the “high money, constrained optionality” branch, is 0% x 70 + 100% x 15, which equals 15. Now we pull back one branching: given that you are in the high-income branch, the expected value of the optionaliy branch is 60% x 95 + 40% x 15 which equals 63. We perform all these calculates from leaves back to root and end up with and Expected Value for the Ph.D. option of 52.8.
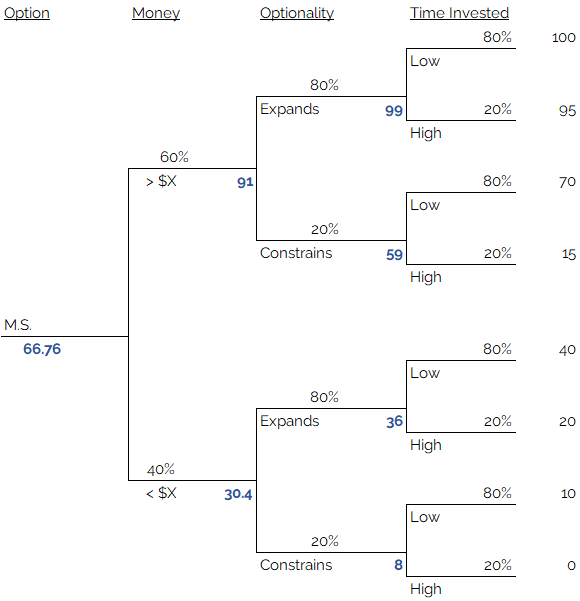
I prefer to use plain old-fashioned spreadsheets to build decision trees, because at this step you can re-use all the logic and structure you just created by easily copy-pasting your subtree and making a new one for the Master’s option, altering only your probabilities, and your EV for the Master’s option will be calculated.
For example, the subject decides the Masters option is 80% likely to take less than 3 years to complete, provides a 60% chance of earning more than the target income level, and has an 80% chance of expanding optionality.
Likewise with the “getting a job” option. Getting a job immediately is unlikely to yield the target salary, and unlikely to expand optionality, but guaranteed to take less than 3 years:
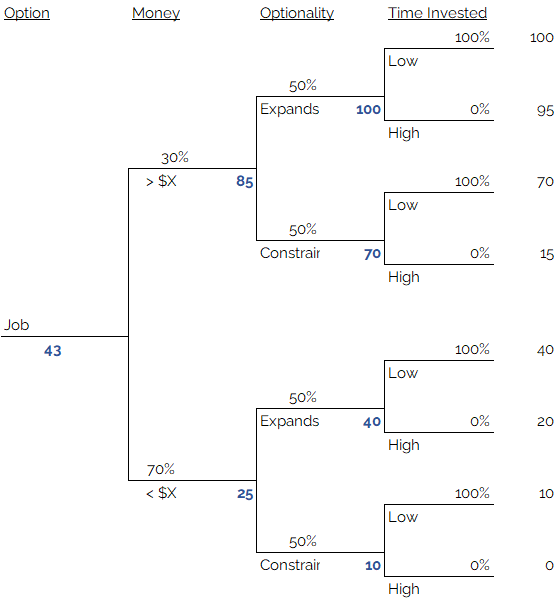
The resulting expected utility values are 52.8 for the Ph.D. option, 66.76 for the M.S. option, and 43 for the get-a-job option. The M.S. option is the clear winner. Having built a decision tree, you can examine why it is a clear winner, in detail. Ultimately the answer is fairly straightforward; the subject highly values optionality, and to a lesser extent money, and does not care too much about investing a lot of time into getting what they want. The Master’s degree is clearly the best choice given this set of preferences.
Step 9: Reflect on the decision.
This may be the most important step in practical decision-making. If you go through the whole framework above and end up with a decision that you still do not feel is the right one, then you have probably not accurately weighed your relative preferences during the utility-weighting phase, or left some important variable out of your calculations entirely. It’s also possible that one of your probabilistic predictions is significantly off-base in a way that reflects either wishful thinking or fear rather than true expectation.
The realization that your tree doesn’t actually reflect your feelings can make the whole exercise worthwhile. If our subject had gone through this process and not felt that the decision was now obvious, realized they should pursue a Master’s degree and then proceeded to get a good night’s sleep, then they might reflect on their feelings and determine that they actually deeply don’t want to spend more time in school, and hadn’t consciously realized this. This would lead them to modify their utility values associated with “time investment” to better reflect their true feelings, and, if they used a live spreadsheet, the result would update automatically.
Once you have your tree, you can also do a sensitivity analysis, by examining how much you would need to change your preferences, or your predictions, to end up with a different decision. You could also perform a value-of-information calculation and determine how much it would be worth to do further research in order to refine your prediction probabilities.
Most of the value in building a tree comes in the process of forcing yourself to clearly think through a problem, breaking it down into important distinctions, expectations, and options, deciding what you think will happen and, more importantly, forcing yourself to be precise about what you want. If you have gone through the process patiently and honestly, you are likely to discover that the answer was obvious before you even calculated the final expected utility for each option.
To recap: In order to build a decision tree, first you list all the options under consideration. Then, list the critical variables. Bin the possible outcomes into discrete buckets. Rank the possible outcomes from best to worst, then assign utility rankings to each outcome. Build the structure of the tree for one option, fill in the utility values at the leaves and the probabilities at the branches. Calculate the expected utility from leaf to root, and, having determined which choice has the highest expected utility, reflect on whether that feels right. If so, you’ve made your choice.